
Author
Marek Tyczynski
Building commerce websites always means building integrations. Every time we work on project that is aimed at selling something (products, subscriptions, paid access, etc.), we have to choose a payment provider that will take care of our transactions.
Almost every payment provider out there gives us the ability to test their services using some sort of testing or sandbox environment. This is a nice chance to fully test the checkout funnel and avoid stressful situations when deploying the application to a live environment. (If you haven't read our previous article on Drupal payment integrations, start here!)
While setting up your commerce checkout flow locally, you’ll probably run into one (or all) of the following hiccups:
- Issues with setting up a payments provider account,
- No ability to parse incoming webhooks,
- Problems with redirecting your customers back to the website.
The reason is simple: you’re hidden behind your NAT/firewall, so there is no way to reach your website from any remote server. As a workaround, you could probably create a manual payment method (for example bank transfer) and use this to browse all steps of your checkout flow. But you'll have to admit: this won't solve your main problem. Alternatively, you could clone your project to a remote environment, but is this always necessary? There has to be a better way to save time and keep working locally whilst keeping the full ability to test and debug remote services. Let’s have a closer look at how to wrap it all together with Drupal 8, Commerce 2 and a small tool called ngrok. In this example, I will be using the Mollie payments platform - scroll down to find out more! (Additional info about how to use Mollie and Drupal together in this post)
Download and set up ngrok
Ngrok is a very simple command line tool that allows you to expose a local web server to the internet. It takes only a few moments to set it up and its variety of configuration options is quite impressive (see the corresponding documentation).
Create ngrok account and download library files
Three easy steps:
- Simply visit ngrok.io and create a new account: https://dashboard.ngrok.com/user/signup
- Download and unpack the ngrok binary: https://ngrok.com/download
- Install your authtoken. Your personal account comes with its own token, which is available for reference via this link: https://dashboard.ngrok.com/get-started
When you get your token, locate the ngrok file and run the following command:
# ./ngrok {command} {param_is_a_token_conaining_lot_of_strange_chars_like_3Adacx$$321!}

./ngrok authtoken 5RpgRe8UA4qFWXtZoZb5P_3KeqMMsh6BjYMtWnJpgJt
Tune up your virtual host
Tune up the configuration of virtual host with the website you want to test by adding the server alias. For example, your apache2 vhost, with URL http://ngork.local, should have a *.ngrok.io alias, so you conf file should start like this:
<VirtualHost *:80>

  ServerName ngrok.local
  ServerAlias *.ngrok.local *.ngrok.io
Run ngrok
The very basic usage to start a simple HTTP tunnel goes like this:
# ./ngrok {command} {local_hostname}:{port}

./ngrok http ngrok.local:80- http command says start an HTTP tunnel
- local_hostname argument says forward tunnel to this hostname
- and port argument says listen on that port
After running the command, you will see ngrok up and running:
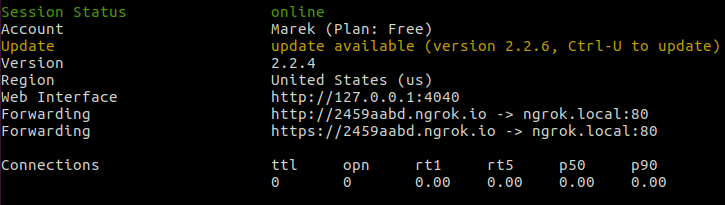
That should do the trick for now: you should be able to visit your page at URL provided by ngrok. The unfortunate thing about a free account is that every time you start a new tunnel, it creates a new URL. You can visit the ngrok web interface at http://127.0.0.1:4040 to check the status, incoming requests, connections, headers and much more.
Set up Commerce 2 / Drupal 8
Our test project needs a basic setup, with the following commerce 2.x modules turned on:
- Commerce Checkout
- Commerce Order
- Commerce Payment
- Commerce Price
- Commerce Product
- Commerce Store
- Commerce Cart - not really required, but helpful to easily jump through the UI
- Commerce Mollie
Configure basics - set up you default store, product type etc. at the end your checkout flow will contain following panes:

Set up a Mollie payment account
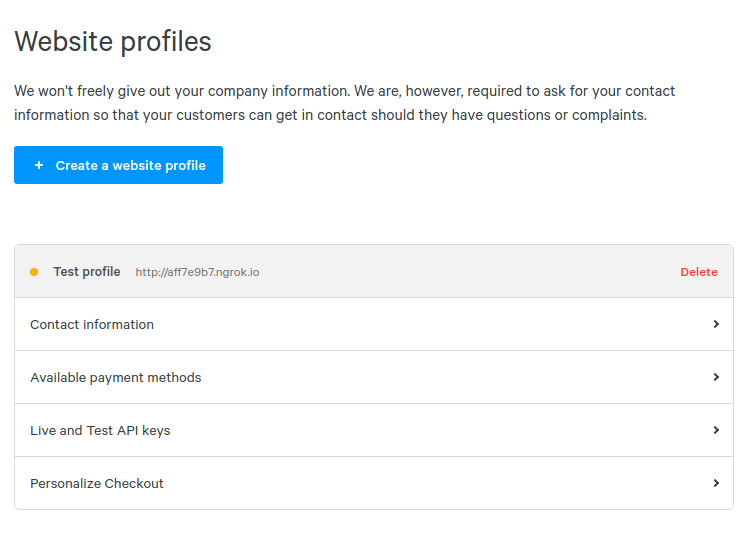
Log in to the Mollie dashboard and jump to the Website profiles page, where you can create a profile or edit an existing one. Under contact information, provide the URL that is generated by your running ngrok process. Mollie will use it to send you all the webhooks:
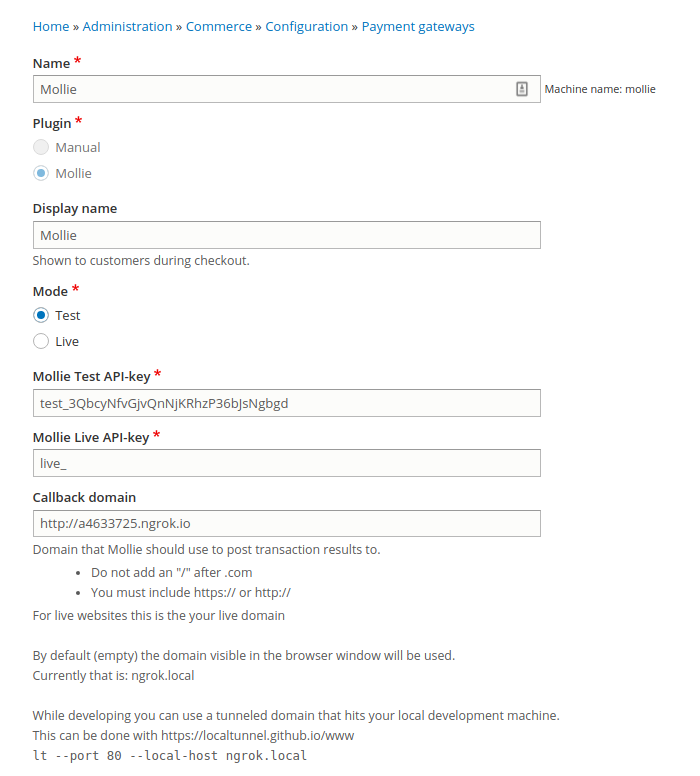
Next, expand the Live end Test API keys pane to find the credentials that you need to configure the payment method in commerce. Install the Mollie Payment module and navigate to the Payment UI ( /admin/commerce/config/payment-gateways). Next, fill out the new payment method form with all the required details:
Test it...
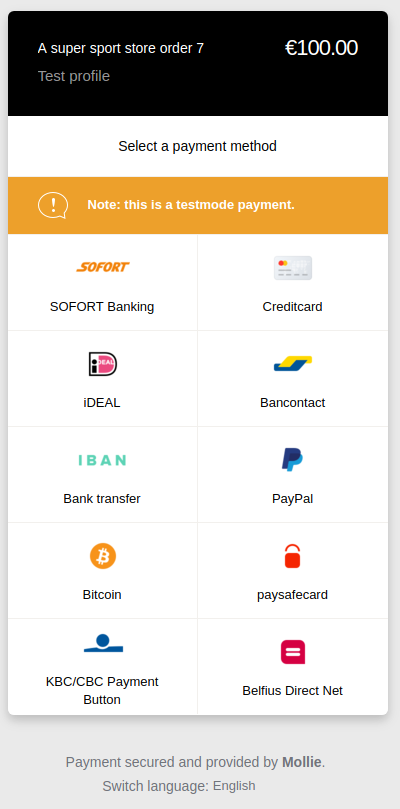
That’s it! You can start with testing your payments, add any product to your cart and run through the checkout. After reviewing your order, you will automatically get redirected to the payment page, select any method and submit your transaction. For payment providers where you can define a full return URL and not only the domain - which is not the case with Mollie -, you can add XDEBUG_SESSION_START={YOUR-IDEKEY}, and start a debug session, as if you were working on a regular local environment.
With ngrok up and running and your Mollie profile properly configured, you will get back to your local website. In the following few minutes, your local project should be receiving a bunch of webhooks. Whilst you wait for them coming in, you can preview your transactions in the Dashboard.
Key takeaways
Ngrok is definitely a great time-saver. It provides a lot of useful features and helps to resolve a variety of problems that you’ll often encounter during local development. In this article, I just demonstrated one example of its usage. It’s good to keep in mind that ngrok allows you to do much more:
- Demoing - with ngrok running on your machine, you can share your local project with your teammates and clients
- Insecure/mixed content check - with ngrok you can access your project via https:// which allows you to check insecure content warnings (no SSL needed!)
- Analysis - using the dashboard that is located at http://localhost:4040, you can inspect all requests/responses
- Secure connection - you can secure your tunnel with a password
- Receiving webhooks - finally, you’re able to receive all webhooks and respond to them
- Developing headless Drupal applications - while working locally you can expose your endpoints to your teammates.
Drupal 8 is a really powerful and API-ready framework. It works very well together with lots of external services. Considering this, in addition to the never-ending technological progress, this flexible situation forces us to leave our self-created comfort zone and “I only use one tool” mentality. There are plenty of options to learn more about and use external tools, APIs and services. This provides a lot of flexibility, but, on the other hand, also requires some adaptation, has a learning curve and requires focus at every single stage of product development.
As developers - who don’t like mistakes, especially when payment integrations and real money are involved - we can’t afford to miss a beat here. Checkout funnels are leads that convert into real sales. They provide crucial business value to our clients and have to be extremely reliable; every payment needs to come through successfully. Testing your payment services through ngrok will allow you to stay in close control of your project, reduce stress and track down any issues before you spin up your application. It doesn’t take much time to set up, but the payoff is tremendous.